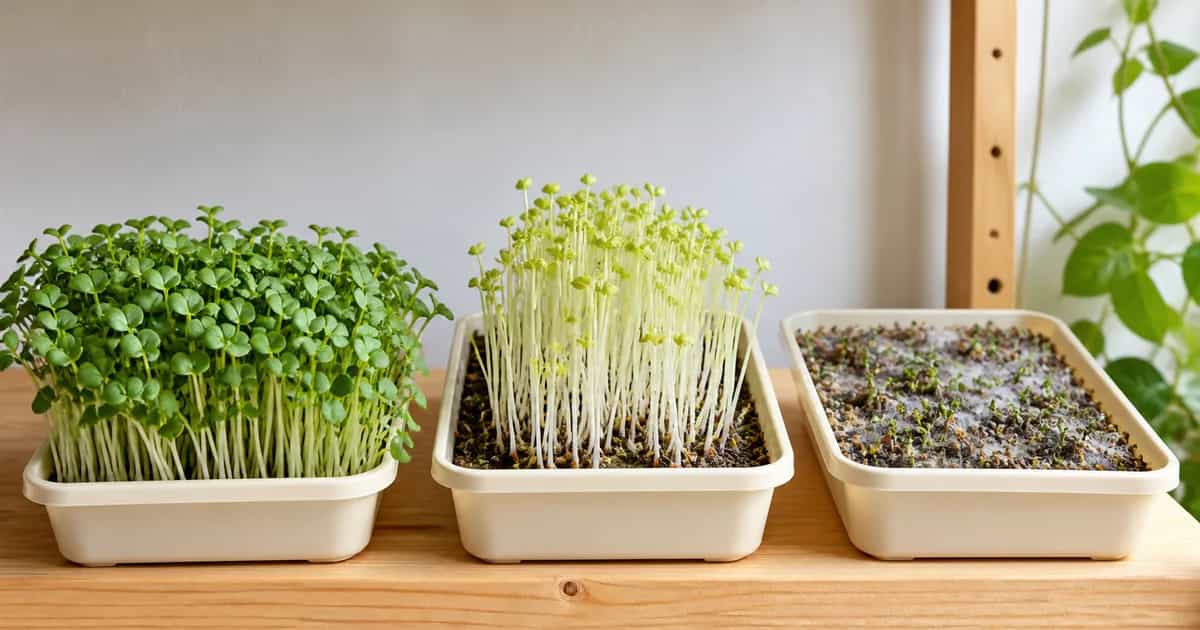
Quick diagnosis table
| Symptom | Most likely checks | First action |
|---|---|---|
| White fuzz only around roots | Root hairs versus mold | Mist one spot; root hairs collapse temporarily. |
| Web-like growth across hulls/media | Mold risk | Isolate tray; do not harvest suspicious crop. |
| Tall pale stems | Light timing/intensity, blackout | Increase appropriate light and shorten blackout next cycle. |
| Bare patches | Seed contact, moisture, viability | Check seed lot and even pressure. |
| Yellow after blackout | Normal before light, or prolonged darkness | Introduce light and observe response. |
| Sudden wilt | Water availability, heat, root damage | Check medium moisture before adding water. |
| Sour or foul odor | Excess moisture, decay, contamination | Discard affected crop and clean equipment. |
1. Root hairs or mold?
Root hairs usually cluster directly around roots in a uniform halo and may appear overnight. A light mist makes them less visible. Mold can bridge seeds, hulls, and media; spread in patches; and produce a musty odor.
When uncertain, do not taste the crop. Isolate it and use the detailed mold prevention guide.
2. Leggy, pale growth
Elongation is normal during a short blackout, but persistent pale, weak stems point to delayed light, low intensity, excess distance, crowding, or heat. Change one variable at a time. Moving a lamp dangerously close can trade legginess for heat or leaf damage.
Use the leggy microgreens guide and lighting guide.
3. Poor or patchy germination
Check the seed’s age and storage, soak requirement, seed-to-medium contact, temperature, and moisture uniformity. Large seeds may need soaking and weight; small mucilaginous seeds often need surface sowing without soaking.
Run a small germination test before blaming the whole setup. Follow the germination troubleshooting guide, seed-soaking guide, and germination science guide.
4. Yellow leaves
Yellow cotyledons immediately after blackout can green under light. Yellowing that develops later may reflect prolonged darkness, root stress, saturated media, nutrient imbalance in longer crops, or natural aging. Look at timing and root condition before adding fertilizer.
5. Wilt and collapse
Wilt can come from a dry medium, high heat, damaged roots, or waterlogged roots that cannot function normally. Touch or inspect the medium below the surface. Do not assume every wilted tray needs more water.
Use the watering guide and temperature-humidity guide.
6. Uneven canopy
Uneven sowing, a tilted tray, inconsistent pressure, edge drying, patchy light, and mixed seed sizes all produce uneven height. Measure seed by tray area, level the medium, rotate only when the light pattern requires it, and document changes.
7. Pests
Fungus gnats often signal persistently wet organic media. Improve sanitation, remove decaying material, reduce unnecessary surface moisture, and use controls appropriate for edible crops. Never apply an unlabeled pesticide to food plants.
8. Odor, slime, or discoloration
These are discard signals, not “wash and rescue” prompts. Clean and sanitize reusable equipment according to product directions, review water and seed sources, and restart with fewer simultaneous variables.
Read the food-safety guide, container guide, and harvest guide.
A disciplined troubleshooting method
Photograph the tray, record dates and conditions, form one hypothesis, change one variable, and compare the next crop. A complete grow log in the tracking tool is more useful than applying light, airflow, fertilizer, and watering changes together.
Bottom line
Diagnose by symptom and timing. When food safety is uncertain, discard the crop; when growth is merely poor, change one controlled variable and document the result.